Microbits - Additional Information
Micro:bits starter kits are free to borrow from any of our 96 libraries right across the network.
Inside each starter kit there is a BBC Micro:bit, a mini-USB cable and a battery pack, along with address links to Libraries NI’s tutorial videos to help a young person to get started with coding and learning more about the digital world.
The nine tutorial videos (with subtitles) will help your child take their first steps in coding and after that there are plenty of examples and exercises on the Micro:bits website.
Micro:bits
A ‘Micro:bit’ is a small programmable computer, designed to make learning code and computers easy and fun!
You can use your Micro:bit for many different cool coding creations, starting small with making your first step counter, a virtual magic eight ball and then on to robots. The Micro:bit can be coded from any web browser in Blocks, Javascript, Python and Scratch with no additional software required.
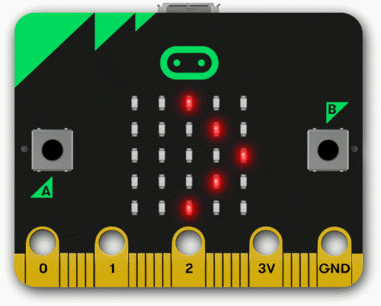
The Micro:bit
There are many features on each device including 25 red LEDs that can flash messages, two programmable buttons that can be used to control games, and motion and direction detectors and finally wireless connectivity.
Visit your local library and borrow a Micro:bit
You can borrow a Micro:bit from any of our 96 libraries right across our network by simply using your library card.
If you are not a member joining is free! If you don’t have a library card, visit your local library and ask to join. Children under 16 will also be asked for a guarantor’s signature and this is usually provided by a parent or guardian.
Subject to availability, you can borrow the micro:bit for up to three weeks. When the three weeks are up you can renew your micro:bit loan, if there is not a waiting list.
Micro:bits are on our stock catalogue to search for stock simply type in Micro:bit in the catalogue search and see the stock or place a reservation.
Using the Micro:bit with a laptop or PC
Connect the Micro:bit to your PC or laptop using the USB cable (it should appear as a removable drive). Once you have done this, you can either head over to the Micro:bit website to get coding: www.microbit.org or go to Libraries NI’s YouTube channel to try out the nine helpful tutorial videos.
When on the Micro:bits website you will see that there are a number of different editors you can use on the site, such as ‘JavaScript Blocks Editor’, ‘Scratch‘ and ‘Python’ (for the more advanced).
Power
When the Micro:bit is connected to your computer with the micro USB, it doesn’t need another power source. When your Micro:bit isn’t connected to your computer, you will need 2 x AAA 1.5 V batteries to power it.
Tutorials and Ideas
The first step once you borrow your Micro:bit is to try out Libraries NI’s helpful tutorials on our YouTube Channel.
Then, once you have got past this stage, visit the Micro:bit ideas page and coding page for lots of coding and projects to make with your Micro:bit. There are over 200 different activities and resources to try, from easy experiments to creative coding challenges.
Using the Micro:bit with a tablet or smart phone
There is a Micro:bit mobile app that lets you send your code to your Micro:bit over Bluetooth (without using a USB cable) and more. Your device will need to have Bluetooth, and this needs to be switched on to pair with the Micro:bit. There is a tutorial on how to do this on Libraries NI’s YouTube channel but, if you have trouble pairing, then try visiting this help page: www.microbit.org/guide/mobile
· Download the App for Apple
· Download the App for Android
Further information and Resources
· Quick start guide
· Safety advice
If you borrow a Micro:bit from your local library and need a bit of inspiration to get you going, there are lots of different ideas and resources on the Internet:
· Micro:bit ideas page
· JavaScript Blocks Editor lessons
· MicroPython Guide
· Introduction to Computer Science course
· Makecode tutorial – just click on the orange ‘getting started button’
· First Steps with Python